
How to replace your website with a new one without downtime?
If during the redesign, you want to show your actual website until the new one is ready, you basically have these options:
- You create the new website locally on your computer and when ready you replace the old website with the new one.
In this case, you can’t show your website in progress to anybody, but only to people who have access to your computer. - You create the new website on another server and when ready you move it to the actual server.
You will be able to show the website in progress, but you need an additional server and you will need time to transfer the website from a server to the other one. - You create the new website on the same server, and when it’s ready you replace the old one with the new one.
Creating a new WordPress website on the same server, and replacing the old one with the new one when ready.
On the internet, you will find many tutorials covering the first two options. This blog post will describe only the last one.
Imagine we want to create a new version of my website https://josemortellaro.com/.
My domain josemortellaro.com points directly to my actual WordPress installation.
If we wanted to create a new website on the same server but still show the actual one, we would need a new independent WordPress installation.
To do so we could add a WordPress installation under a subfolder of the main directory josemortellaro.com.
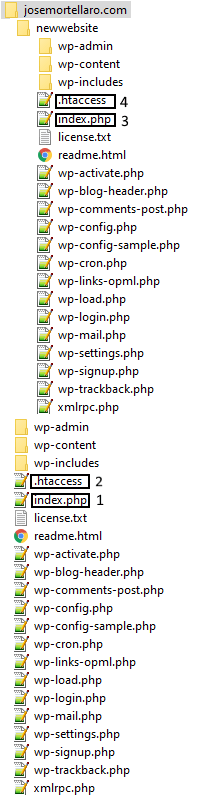
The picture shows the main directory josemortellaro.com that you can reach going at https://josemortellaro.com/
The folders “wp-admin”, “wp-content”, “wp-includes” that are immediatelly under josemortellaro.com belong to the WordPress installation that is outputting my actual website.
Instead, the folder “newwebsite” contains the new WordPress installation that we will use to create the website in progress.
Nowadays usually the webserver gives you the possibility to automatically install WordPress using a Control Panel script.
During the installation, you will see something that looks like the following picture.
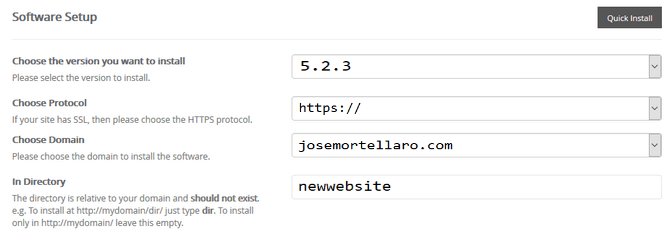
In this case, to add the new installation in our subfolder, we will set “newwebsite” in the directory field.
The file index.php 1 is the first parsed file to output my actual website.
After installing WordPress in the “newwebsite” folder, you would be able to reach the new website at https://josemortellaro.com/newwebsite/. In this last case, the parser would call first index.php 3.
If you don’t change anything and let all as it is, you will have the following situation:
- Visiting https://josemortellaro.com/ the parser will call index.php 1 outputting my actual website
- Visiting https://josemortellaro.com/newwebsite/ the parser will first call the file index.php 3 outputting the site in progress.
Code of index.php, the first file we call to output our website.
Here you can see the content of index.php.
<?php
/**
 * Front to the WordPress application. This file doesn't do anything, but loads
 * wp-blog-header.php which does and tells WordPress to load the theme.
 *
 * @package WordPress
 */

/**
 * Tells WordPress to load the WordPress theme and output it.
 *
 * @var bool
 */
define( 'WP_USE_THEMES', true );

/** Loads the WordPress Environment and Template */
require( dirname( __FILE__ ) . '/wp-blog-header.php' );
This file just defines the PHP constant “WP_USE_THEMES” and calls a second file called wp-blog-header.php.
Don’t worry if you don’t understand this PHP code. It’s enough for you to understand that index.php is the first file that is called to output a WordPress website, that’s it.
When the new website is ready, we will modify this file to replace the old website with the new one.
Be careful, this file may be changed after a WordPress update.
If you want to be sure that your code is not changed, you should I suggest you make a copy of index.php, and rename it to my-index.php (or whatever other name).
Then add this line to the file .htaccess:
DirectoryIndex my-index.php index.php
When WordPress updates all the core files, my-index.php will not be touched.
If you want to create a new version of my website, you have two options:
- You work on the new website in progress on https://josemortellaro.com/newwebsite/ and when ready you modify index.php 1 to replace the old website with the new one.
- You already modify index.php 1 to show the site in progress only to authorized users.
Working on the new website in progress visible on a subfolder.
If you decide to show the website in progress in the subfolder you will modify the index.php file only after the new website is ready.
If you do so, it will be easier to show the website in progress to whoever you want.
If you adopt this method, before modifying the index.php 1 file, you should check all your internal links.
In my case, I would need to replace all internal links that point to https://josemortellaro.com/newwebsite/ with https://josemortellaro.com/.
Be careful, you don’t have to modify the static resources URLs. If e.g. you have an image served by https://josemortellaro.com/newwebsite/wp-content/upload/09/image-example.jpg/, you have to let it as it is.
But if you have a link that points to an internal page as https://josemortellaro.com/newwebsite/contact/, you will need to replace it with https://josemortellaro.com/contact/
Remember also to copy index.php to my-index.php and modify the file .htaccess to set my-index.php as the first PHP file that has to be called.
Of course you can manually replace all internal links, but this would require time.
Better a bulk action that in one shot replaces “https://josemortellaro.com/newwebsite/” with “https://josemortellaro.com/”.
To do it in one shot, do the following:
- Make a back-up of the entire website.
- Install a “Search and Replace” plugin.
- Replace href=”https://josemortellaro.com/newwebsite with href=”https://josemortellaro.com in the database table wp_posts.
To make a back-up of your website you can use the plugin All in One WP Migration. It’s very easy and tested by millions of users.
As search and replace plugin you can use Better Search Replace.
After installing Better Search Replace, go to Tools => Better Search Replace.
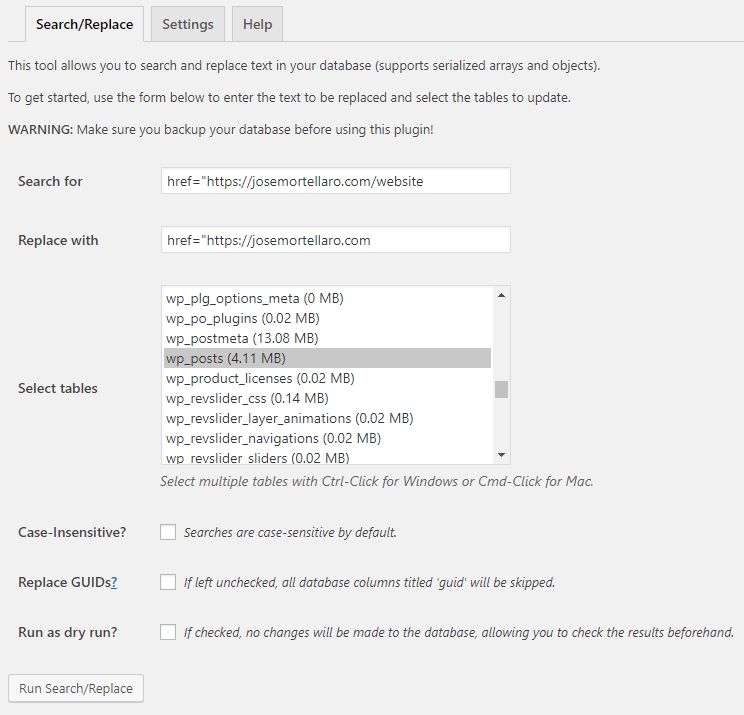
The picture above shows how I would replace my internal links.
Be careful, you have to select the table “wp_posts”, in another case you could have problems with your new website.
Selecting wp_posts you are sure that the plugin will replace only in the content and in no other place.
Use href=”https://josemortellaro.com/newwebsite to be sure the replacement will exclude images or other static resources sources.
You don’t know if in some places you have href=”https://josemortellaro.com/newwebsite” or href=”https://josemortellaro.com/newwebsite/” or href=”https://josemortellaro.com/newwebsite/page-example/”…
So use href=”https://josemortellaro.com/newwebsite instead of href=”https://josemortellaro.com/newwebsite” .
Using href=”https://josemortellaro.com/newwebsite we get all internal links in one shot.
If you have internal links outputted by shordcodes, you can use the same method, but using the shortcode parameter.
Imagine you have a shortcode that looks like [shortcode_example link=”https://josemortellaro.com/newwebsite/page-example”].
In this case you will replace [shortcode_example link=”https://josemortellaro.com/newwebsite with [shortcode_example link=”https://josemortellaro.com
Replacing the old website with the new one modifying index.php and changing the website URL in the WordPress General Options.
When the new website is ready, you have just to do a little change in index.php 1 and change the website URL in the WordPress General Options.
Changes in index.php.
In index.php 1 just replace /wp-blog-header.php with /newwebsite/wp-blog-header.php
Doing so, WordPress will call the file wp-blog-header.php of the new installation, outputting the new website.
Use your favorite file editor to open and modify index.php.
If you have never done it, read this tutorial to learn how to use Notepad++ for editing a WordPress file.
The final index.php 1 will be as shown below.
<?php
/**
 * Front to the WordPress application. This file doesn't do anything, but loads
 * wp-blog-header.php which does and tells WordPress to load the theme.
 *
 * @package WordPress
 */

/**
 * Tells WordPress to load the WordPress theme and output it.
 *
 * @var bool
 */
define( 'WP_USE_THEMES', true );

/** Loads the WordPress Environment and Template */
require( dirname( __FILE__ ) . '/newwebsite/wp-blog-header.php' );
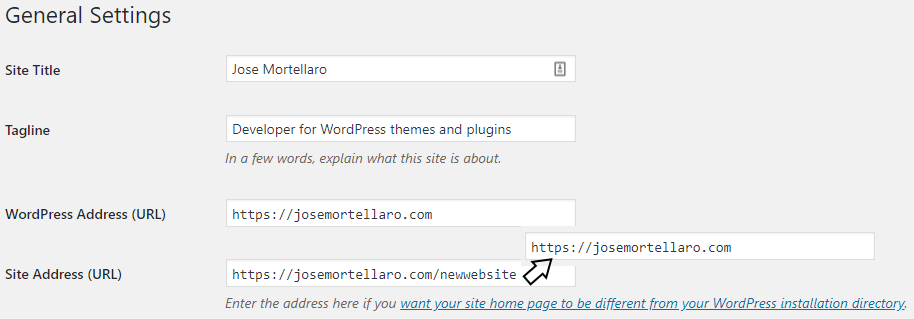
Changes in Settings => General.
In Settings => General we replace https://josemortellaro.com/newwebsite with https://josemortellaro.com in the Site URL field.
Doing so, all dynamic links, especially the navigation, will have https://josemortellaro.com/… instead of https://josemortellaro.com/newwebsite/….
Working on the new website in progress already visible on the main domain URL.
If you decide to show the website in progress on the main domain URL you need to modify the file index.php 1 to show the website in progress only to the authorized users, while all other people will see the actual website until the new one is not ready.
Moreover, since the beginning, we go to Settings => General and replace https://josemortellaro.com/newwebsite with https://josemortellaro.com in the Site URL field as shown in the last picture above.
Doing so you don’t have to care to the internal links, they will be the right ones since the beginning,
Here the difficult part is how to change the file index.php.
Your goal is to show the actual website to everyone, but give the possibility to see the website in progress to yourself and authorized users.
Authorize users to see your site in progress by IP address.
In the following example we modify the index.php file to show the website in progress to the users havng the IP addresses xx.xxx.xxx.xxx and yy.yyy.yyy.
<?php
/**
 * Front to the WordPress application. This file doesn't do anything, but loads
 * wp-blog-header.php which does and tells WordPress to load the theme.
 *
 * @package WordPress
 */

/**
 * Tells WordPress to load the WordPress theme and output it.
 *
 * @var bool
 */
define( 'WP_USE_THEMES', true );

if( array( $_SERVER['REMOTE_ADDR'],array( 'xx.xxx.xxx.xxx','yy.yyy.yyy.yyy' ) ) ){
	/** Loads the WordPress Environment and Template in progress*/
	require( dirname( __FILE__ ) . '/newwebsite/wp-blog-header.php' );
}
else{
	/** Loads the actual WordPress Environment and Template*/
	require( dirname( __FILE__ ) . '/wp-blog-header.php' );
}
If you use this condition you should replace xx.xxx.xxx.xxx and yy.yyy.yyy.yyy with the IPs you want to authorize.
If you want to know your IP address go to https://www.iplocation.net/find-ip-address
If you have a dynamic IP address, it will frequently change. In this case better to use another condition that doesn’t change so frequently.
Authorize users to see your site in progress by adding a password to the URL.
In the following snippet, we modify the index.php file to show the website in progress adding a password to the URL.
<?php
/**
 * Front to the WordPress application. This file doesn't do anything, but loads
 * wp-blog-header.php which does and tells WordPress to load the theme.
 *
 * @package WordPress
 */

/**
 * Tells WordPress to load the WordPress theme and output it.
 *
 * @var bool
 */
define( 'WP_USE_THEMES', true );
$password = 'fsdlkj324523h';
if(
	isset( $_GET['password'] ) && $password === $_GET['password']
	|| isset( $_COOKIE['site_in_progress'] ) && $password === $_COOKIE['site_in_progress']
){
	if( !isset( $_COOKIE['site_in_progress'] ) ){
		setcookie( 'site_in_progress',$password,time() + ( 86400 * 30 ), "/"); // 86400 = 1 day
	}
	/** Loads the WordPress Environment and Template in progress*/
	require( dirname( __FILE__ ) . '/newwebsite/wp-blog-header.php' );
	exit;
}
else{
	/** Loads the actual WordPress Environment and Template*/
	require( dirname( __FILE__ ) . '/wp-blog-header.php' );
}
In the snipped above first we decide a password. In the example it’s fsdlkj324523h.
When we visit the website, adding that password to the URL as query argument, we will load the file /newwebsite/wp-blog-header.php, outputting the website in progress.
This means that visiting https://josemortellaro.com/ you would see my actual website. Visiting https://josemortellaro.com/?passwod=fsdlkj324523h you would see my website in progress.
Once the password is right, the code will check for the cookie “site_in_progress”. If this cookie doesn’t exist it creates it assigning the password as value.
Next time you visit https://josemortellaro.com/ with the same browser because your browser has that cookie, you will see the site in progress, without the need to add again the password in the URL.
In the example above the cookie expires after 30 days.
After the cookie expires, the user has to add the password in the URL to see again the website in progress.
If you adopt this method, it will be a good idea to see the actual website with another browser or using “Incognito Window” and the website in progress with the browser having the “site in progress” cookie.
When the new website is completelly ready, restore the original index.php content, but replacing /wp-blog-header.php with /newwebsite/wp-blog-header.php.
Summary.
CREATING A NEW WORDPRESS WEBSITE ON THE SAME SERVER, AND REPLACING THE OLD ONE WITH THE NEW ONE WHEN READY.
- Create a new installation in a subfolder, e.g. in https://your-domain.com/newwebsite/
- When the new website is almost ready, make a back-up, install a “search and replace” plugin to replace all internal links https.//your-domain.com/newwebsite with https://your-domain.com
- In the index.php of the main domain folder, replace /wp-blog-header.php with /newwebsite/wp-blog-header.php
WORKING ON THE NEW WEBSITE IN PROGRESS ALREADY VISIBLE ON THE MAIN DOMAIN URL.
- Create a new installation in a subfolder, e.g. in https://your-domain.com/newwebsite/
- Since the beginning, in the index.php of the main domain folder add a condition to show the site in progress only to the authorized users.
- When the new website is ready, take away the condition and just call the wp-blog-header.php file included in the subfolder